Free Yoga Nidra Script
A complete script you can read aloud, along with the setup guidance that makes the difference between a student resting and a student waiting for the practice to be over.
Below is the full yoga nidra script we use at Soul Strong Yoga, free to read, print, and use. It runs roughly twenty-five to thirty-five minutes depending on your pace and how long you hold the pauses.
Before the script, there is a section on setting up the body. We put it first on purpose. Most of what determines whether someone actually rests in yoga nidra happens before you say a word.
Printable version. The same script formatted for teaching, with pause cues marked and room for your own notes.
Download the PDFSetting Up for Rest
Yoga nidra asks the nervous system to downshift. That is difficult to do while any part of the body is still working. A low back that aches at minute twelve, a chin tipped too far back, a body slowly getting cold: each one gives the mind a small ongoing task, and the practice becomes about managing discomfort instead of resting.
Ten minutes of unhurried setup buys thirty minutes of real rest. Give students that time, and tell them the time is theirs.
Lying down
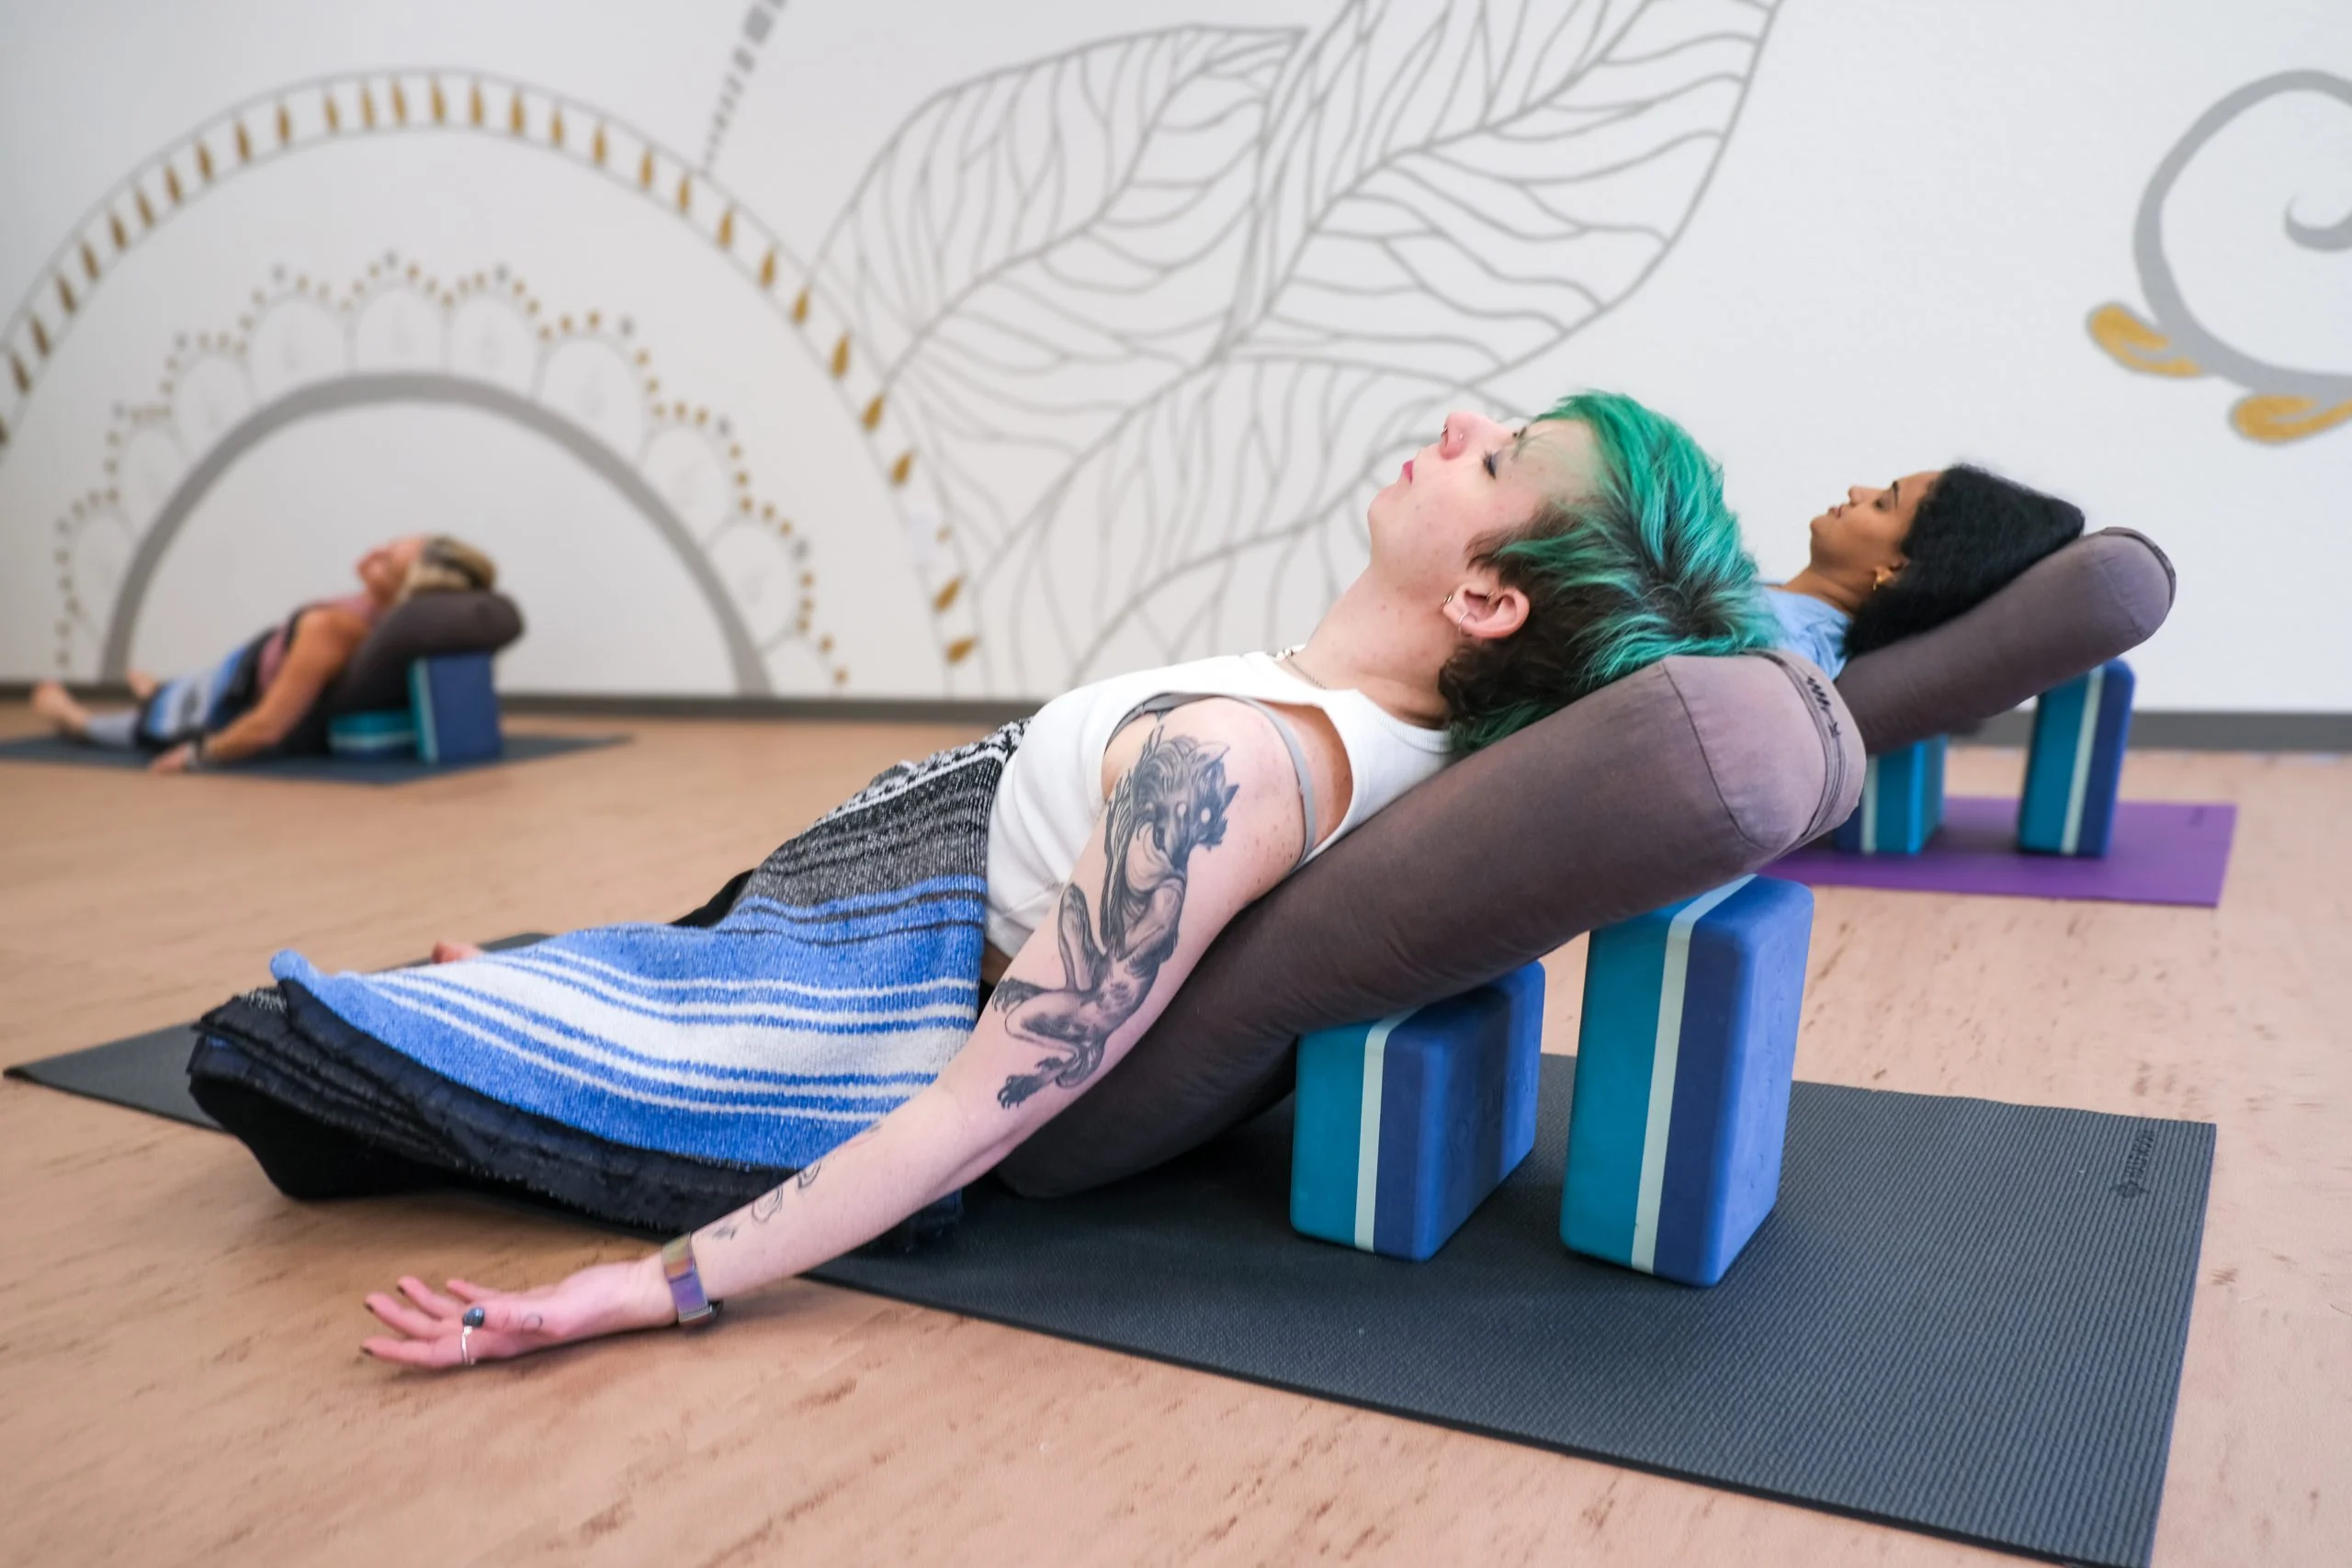
- Something under the knees. A bolster or rolled blanket. This is the single most useful prop in the practice, because it releases the low back and lets the pelvis settle.
- Something thin under the head. A folded blanket or small pillow, enough that the chin sits slightly lower than the forehead. This keeps the throat comfortable and the airway open.
- Warmth. Body temperature drops during deep rest. A blanket over the body and socks on the feet matter more than most teachers expect. A cold student will not stay in the practice.
- Padding under the sitting bones if the floor is hard, using a folded blanket or a piece of a mat.
- Arms slightly away from the ribs, palms wherever they naturally land.
- Eyes. An eye pillow or folded cloth if it is welcome. Always offered, never assumed. Eyes open and softly resting on one spot is a legitimate choice, and for some students it is the safer one.
Supported upright
Plenty of students cannot lie flat, or would rather not. Supported upright is not a lesser version of the practice, and it should be offered from the beginning rather than produced on request.
- A chair with all four feet securely on the floor. Feet flat, or blocks or books under the feet so the knees are supported and the thighs are not hanging.
- A rolled blanket at the low back so the spine is held rather than holding itself.
- Head support. A wall behind the chair, a high-backed chair, or a rolled blanket behind the neck. Without it, the neck works for the whole practice.
- Hands resting in the lap or on a cushion, so the shoulders can let go.
- A blanket over the lap.
Other positions worth offering
- Side-lying, with a bolster between the knees and support under the head. Good during pregnancy, and comfortable for many people for whom lying on the back is not.
- Legs elevated, calves resting on a chair seat or a stack of cushions.
- Torso raised on a bolster or wedge, which helps with reflux, congestion, and some breathing conditions.
- In bed, propped on pillows. For home practice this is often the most honest answer.
Name the options before anyone has to ask. Lying flat may not work well during pregnancy, with acid reflux, with certain breathing or cardiac conditions, after recent surgery, with vertigo, or with some chronic pain conditions. For some students, lying supine with the eyes closed brings on anxiety rather than rest.
If you offer upright and side-lying at the top of class as ordinary choices, no student has to identify themselves as an exception in front of the room. That single habit does more for accessibility than any prop.
Props you already have
Say this out loud, especially to students practicing at home: couch cushions, rolled bath towels, sofa pillows, a stack of books, a folded quilt. Nobody needs to buy anything to rest.
The room
Keep it slightly warmer than you would for asana. Lower the lights, though not to full darkness if that is uncomfortable for anyone. Phones in another room or on airplane mode. If there is noise you cannot control, name it at the top of class so it becomes part of the practice instead of an interruption.
How long to plan for
Allow thirty to forty-five minutes in total: setup, the script, and an unhurried return. The re-entry is part of the practice, not the end of it.
Teaching Notes
- Go slower than feels natural. Nearly every new facilitator reads too quickly. When you think you have left enough silence, leave a little more.
- Keep the body scan brisk. This is the exception to the point above. Name each part, let awareness touch it, and move on. Students are not concentrating or breathing into anything. The predictable, unhurried-but-steady rhythm is what allows awareness to glide.
- Use your ordinary voice. Steady volume, dropping slightly at the ends of sentences. Resist the breathy meditation voice, which asks students to attend to you rather than to themselves.
- Read the pause cues as actual pauses. They are written into the script because they carry the practice.
- Say less about the sankalpa than you want to. Offer the instruction, then get out of the way. Do not suggest what someone's intention should be.
- If someone snores, leave them alone. They needed the sleep. Sleeping through nidra is not failing at it.
- Protect the return. Students come back disoriented and slow, which is the point. Do not fill the silence, and do not rush anyone to sit up.
The Script
Italicized centered lines are cues for you, not words to read aloud.
Welcome to Yoga Nidra, often called yogic sleep, a practice of guided meditation that invites deep rest and relaxation. In this state, the body rests while the mind remains awake and receptive. Yoga Nidra can help calm the nervous system, reduce stress, and support deeper sleep and restoration.
As we begin, find a comfortable position. Take this time to set up your cozy nest. You are worthy of extra time.
Gently close your eyes and bring your awareness to the natural rhythm of your breath.
During this practice, I invite you to remain awake and receptive to the sound of my voice. If your mind wanders or thoughts arise, simply notice them and gently guide your attention back to the practice.
SankalpaNow begin by setting a heartfelt intention, known in Yoga Nidra as a sankalpa. This may be something you wish to invite into your life or a quality you wish to embody. State it in the present tense, as though it is already true. Silently repeat it to yourself three times.
pause
Inner ResourceNow bring your awareness to a place of safety and peace within yourself. This may be a real place or an imagined one. Somewhere you feel supported, calm, and at ease. Spend a moment visualizing this sanctuary, knowing you can return to it at any point during the practice.
pause
Rotation of ConsciousnessWe will begin by bringing attention to different parts of the body. As I name each body part, simply notice it and then move on to the next. There is no need to concentrate intensely; just allow your awareness to flow effortlessly.
Bring awareness to the right hand thumb. Index finger. Middle finger. Ring finger. Pinky finger. Palm of the right hand. Back of the right hand. Right wrist. Forearm. Elbow. Upper arm. Right shoulder. Right underarm. Right waist. Right hip. Right glute. Front of the right leg. Right knee. Right calf. Right ankle. Right heel. Sole of the right foot. Top of the right foot. Right big toe. Second toe. Third toe. Fourth toe. Fifth toe.
Now sensing the entire right side of the body. The whole right side of the body together as one.
pause
Left hand thumb. Index finger. Middle finger. Ring finger. Pinky finger. Palm of the left hand. Back of the left hand. Left wrist. Forearm. Elbow. Upper arm. Left shoulder. Left underarm. Left waist. Left hip. Left glute. Front of the left leg. Left knee. Left calf. Left ankle. Left heel. Sole of the left foot. Top of the left foot. Left big toe. Second toe. Third toe. Fourth toe. Fifth toe.
Now sensing the entire left side of the body. The whole left side of the body together as one.
pause
Bring awareness to the back of the body. Back of the head. Back of the neck. Back of the shoulders. Back of the right arm. Back of the left arm. The whole spine. The hips. Back of the right leg. Back of the left leg. Right calf. Left calf. Right heel. Left heel.
Now sensing the entire back of the body all together as one.
pause
Bring awareness to the front of the body. Forehead. Brow. Eyes. Tip of the nose. Nostrils. Cheeks. Ears. Upper lip. Lower lip. Chin. Jaw. Front of the throat. Chest. Front of the right arm. Front of the left arm. Abdomen. Front of the right hip. Front of the left hip. Front of the right leg. Front of the left leg. Right kneecap. Left kneecap. Front of the lower right leg. Front of the lower left leg. Top of the right foot. Top of the left foot.
Now sensing the entire front of the body as one.
pause
Now bring all parts together. The right side of the body. The left side of the body. The back of the body. The front of the body.
Sensing the whole body together as one complete field of awareness. The whole body.
longer pause
Now returning again to different areas of the body.
The whole right hand. The whole right arm. The whole left hand. The whole left arm. Both arms together.
The whole head.
Chest and belly together.
Now sensing the entire upper body as one.
pause
Bring awareness to the lower body. The hips. The right leg. The left leg. The right foot. The left foot.
Now sensing the whole lower body together as one.
pause
Once again, sensing the whole body together. The entire body resting here in this room. The whole body and the space surrounding the body.
longer pause
Breath AwarenessNow bring your awareness to your breath. The natural incoming breath. The natural outgoing breath. No need to change anything. Simply observing the breath exactly as it is.
pause
Begin to count your breath from nine to zero. Inhale for nine. Exhale for nine. Inhale for eight. Exhale for eight.
Continuing in your own rhythm, gradually counting down toward zero. If you lose count, simply return to nine and begin again.
long pause
OppositesNow allow the counting to fade.
Imagine your body becoming pleasantly heavy. As though every muscle is softening into the surface beneath you. Your arms feel heavy. Your legs feel heavy. Your torso feels heavy. Your whole body resting with ease.
pause
Now experience the opposite. Imagine the body becoming light. Spacious. Almost weightless. As though you could effortlessly float on a gentle cloud or drift upon calm water. The body is light. Open. Free.
pause
Now notice a feeling of warmth spreading throughout the body. A comfortable warmth, like resting in gentle morning sunshine. Warmth in the hands. Warmth in the feet. Warmth throughout the entire body.
pause
Now imagine a cool, refreshing sensation. Like a soft breeze across your skin or cool evening air after a warm day. Calm. Comfortable. Refreshing.
pause
Allow both experiences to dissolve. There is nothing to hold onto. Simply resting in awareness.
longer pause
VisualizationNow bring awareness to your visual field. Notice any darkness, colors, shapes, or patterns drifting through your awareness. Simply observe without effort.
pause
Now visualize the following images as they arise:
A full moon. Clear running water. A warm cup of tea. A leaf floating down a river. Laughter with friends.
pause
optional: play instruments or meditation music
Now I will play my sound healing tools for you. I invite you to rest and allow the sounds to wash over you.
As the final sounds begin to fade, allow yourself to rest in the quiet that remains.
longer pause
Returning to the SankalpaNow gently bring to mind the heartfelt intention you set at the beginning of your practice. Your sankalpa.
Silently repeat it to yourself three times with sincerity, allowing it to settle deeply within you, as though planting a seed in fertile soil.
Trust that this intention has been received.
pause
Re-entryNow become aware once again of the points of contact between your body and the surface beneath you. Feel the support beneath your body. The space around you.
Resting here. Supported here.
pause
Gradually begin returning your awareness to the room around you. Sense your entire body once again. Your breath. The sounds around you.
Begin gently awakening the body with small movements. Wiggle the fingers and toes. Circle the wrists and ankles. Deepen the breath.
Take your time transitioning back.
And when you feel ready, slowly open your eyes.
Teaching Note: The Kosha System and Yoga Nidra
This script loosely follows the kosha model from yogic philosophy, which describes five layers of human experience. Rather than teaching the koshas explicitly during the practice, the script guides students through them experientially.
- Annamaya Kosha (physical body). The body scan and whole body awareness practices support grounding in physical sensation and embodiment.
- Pranamaya Kosha (energy and breath body). Breath awareness and counting help students connect with the rhythm and flow of prana.
- Manomaya Kosha (mental and emotional body). Visualization, imagery, memory, and emotional tone engage the mental and emotional layers of awareness.
- Vijnanamaya Kosha (wisdom and witness awareness). Repeated invitations to observe without effort cultivate witnessing, non-reactive awareness.
- Anandamaya Kosha (bliss and rest layer). Moments of spaciousness, support, stillness, and deep rest allow students to settle into quieter states of ease and integration.
This approach creates an accessible, modern yoga nidra experience while still honoring traditional yogic structure and philosophy.
Questions We Get
Is it okay if I fall asleep?
Yes. Falling asleep is not failing at yoga nidra. If you fell asleep, your body took what it needed. Over time, most people find they stay closer to the threshold between waking and sleeping, which is where the practice lives.
Do I have to lie down?
No. Supported upright in a chair works well, and so does side-lying or reclining propped on pillows. The setup section above covers each option. What matters is that the body is supported enough that it does not have to work.
How long does this practice take?
The script runs about twenty-five to thirty-five minutes depending on your pace. Allow thirty to forty-five minutes in total so setup and the return are not rushed.
Can I use this script to teach my own classes?
Yes. It is offered freely for your personal practice and for teaching your own students. We ask that you credit Soul Strong Yoga and that you not sell it or publish it as your own material.
Is yoga nidra the same as meditation?
They overlap, but the position and the aim differ. Seated meditation usually asks you to sustain attention while upright and alert. Yoga nidra guides you toward the edge of sleep while lying down or supported, with awareness staying receptive rather than focused.
Can yoga nidra replace sleep?
It is not a substitute for sleep, though many people find it supports better sleep and offers real restoration on nights when sleep was short. If you are dealing with ongoing insomnia or another sleep condition, it is worth talking with your doctor.
Want to learn to guide this practice well? Yoga nidra is part of our teacher training, along with sequencing, anatomy, philosophy, and the accessible teaching skills that let you meet real students where they are.
Explore our online YTT